How to Store & Thaw Steak Properly for Maximum Freshness
📋 Table of Contents
- Introduction: Why Proper Storage Matters
- Understanding Steak Storage Basics
- Refrigerator Storage: Short-Term Solutions
- Freezer Storage: Long-Term Preservation
- The Vacuum Sealing Advantage
- Safe Thawing Methods Explained
- Refrigerator Thawing: The Gold Standard
- Cold Water Thawing: Quick Alternative
- Common Storage Mistakes to Avoid
- Signs of Freshness vs. Spoilage
- Conclusion
Introduction: Why Proper Storage Matters
Investing in premium steak is only half the battle. The way you store and thaw your meat directly impacts its flavor, texture, and safety. Even the highest-quality filet mignon or ribeye can lose its appeal if handled improperly, resulting in freezer burn, bacterial growth, or compromised taste.
Understanding proper storage techniques protects your investment and ensures every steak you prepare delivers the exceptional dining experience you paid for. Whether you’ve purchased fresh steaks from your local butcher or received a delivery of frozen premium cuts, the methods you use to store and thaw them make all the difference between a mediocre meal and a restaurant-quality triumph.
This comprehensive guide reveals professional storage and thawing techniques used by butchers, chefs, and meat experts. You’ll learn exactly how to maintain maximum freshness from purchase to plate, avoiding the common mistakes that lead to wasted money and disappointing results. From optimal freezer temperatures to safe thawing timelines, we’ll cover every detail you need to preserve your steak’s quality perfectly.
💡 Quick Success Tip
The golden rule of steak storage: keep it cold, keep it dry, and minimize air exposure. These three principles form the foundation of all effective storage strategies, whether you’re refrigerating for tomorrow or freezing for months.
Understanding Steak Storage Basics
Steak deterioration occurs through three primary mechanisms: bacterial growth, oxidation, and moisture loss. Bacteria multiply rapidly at temperatures above 40°F, which is why refrigeration is essential for slowing microbial activity. Oxidation happens when meat surfaces are exposed to air, causing discoloration and off-flavors. Moisture loss leads to texture changes and freezer burn in frozen meat.
The Science of Meat Preservation
Understanding what happens to steak at the cellular level helps explain why certain storage methods work better than others. Fresh meat contains enzymes that continue breaking down muscle fibers even after butchering. Cold temperatures slow this enzymatic activity but don’t stop it completely. Freezing essentially pauses these processes by forming ice crystals that immobilize water molecules necessary for bacterial growth and enzyme function.
Temperature consistency matters as much as absolute temperature. Fluctuating temperatures cause repeated freeze-thaw cycles that damage meat’s cellular structure, leading to moisture loss and texture degradation. This explains why chest freezers often preserve meat better than refrigerator freezer compartments, which experience more temperature fluctuation from frequent door openings.
🎯 Storage Temperature Guidelines
Refrigerator Storage: Maintain 32-40°F (0-4°C) for optimal freshness
Freezer Storage: Keep at 0°F (-18°C) or below to prevent quality loss
Danger Zone: Avoid 40-140°F (4-60°C) where bacteria multiply rapidly
Room Temperature Limit: Never leave steak at room temperature for more than 2 hours
Fresh vs. Previously Frozen Considerations
Many home cooks wonder whether they can refreeze steak that was previously frozen and thawed. The answer depends on how the meat was thawed. If thawed properly in the refrigerator and kept cold throughout, refreezing is safe but will impact quality. Each freeze-thaw cycle causes ice crystals to rupture more cell walls, resulting in moisture loss and texture changes when ultimately cooked.
Premium suppliers like Omaha Steaks use flash-freezing technology that creates smaller ice crystals than home freezers produce, minimizing cellular damage. This professional freezing method is one reason their frozen steaks often rival fresh options in quality.

Refrigerator Storage: Short-Term Solutions
Refrigerator storage works well for steaks you plan to cook within a few days. Fresh steak remains at peak quality for 3 to 5 days when properly refrigerated, though this timeline varies based on the cut, initial freshness, and your refrigerator’s exact temperature.
Check Original Packaging
If your steak came in sealed packaging from a reputable supplier, you can leave it unopened until ready to use. Commercial packaging is designed to minimize air exposure and maintain optimal conditions. Only open if you notice damage or plan to season ahead.
Rewrap if Necessary
For butcher-wrapped steaks or opened packages, rewrap tightly in plastic wrap, pressing out air bubbles. Then wrap again in aluminum foil or place in a zip-top bag. This double-layer approach provides extra protection against moisture loss and odor absorption from other foods.
Place on Lowest Shelf
Store wrapped steak on the lowest refrigerator shelf, ideally in the back where temperature is most consistent. This placement prevents any potential drips from contaminating other foods below. Place a plate or tray underneath as additional protection.
Monitor Storage Time
Label packages with the storage date. Plan to cook within 3 days for optimal freshness, or 5 days maximum for vacuum-sealed products. If your plans change, move to the freezer before the steak begins losing quality.
⚠️ Critical Warning
Never store raw steak near ready-to-eat foods or on shelves above other items. Raw meat juices can drip and cause cross-contamination. Always maintain strict separation between raw and cooked foods in your refrigerator to prevent foodborne illness.
The Dry-Aging Alternative
Some enthusiasts practice dry-aging at home in their refrigerators to enhance flavor and tenderness. This advanced technique requires precise temperature control, humidity management, and airflow. Steaks are placed uncovered on a wire rack, allowing surface moisture to evaporate while enzymatic processes tenderize the meat over several weeks.
Home dry-aging is challenging and carries risks of spoilage if conditions aren’t perfect. Most home cooks should stick to conventional refrigerator storage or purchase professionally dry-aged steaks from specialty providers who control every variable precisely.

Freezer Storage: Long-Term Preservation
Freezing extends steak’s storage life dramatically, allowing you to stock up on premium cuts when sales occur or preserve bulk purchases. Properly frozen steak maintains excellent quality for 6 to 12 months, with minimal flavor or texture loss when handled correctly.
Optimal Freezing Techniques
The key to successful freezing lies in minimizing ice crystal formation and preventing freezer burn. Freezer burn occurs when air reaches the meat surface, causing dehydration and oxidation that create grayish-brown discolored spots with off-flavors.
Remove Excess Moisture
Pat steaks completely dry with paper towels before freezing. Surface moisture forms larger ice crystals that damage meat tissue. The drier the surface, the better the texture preservation during freezing and thawing.
Wrap Tightly in Plastic
Wrap each steak individually in plastic wrap, pressing the wrap directly against all surfaces to eliminate air pockets. Ensure complete coverage with no exposed areas. This first layer is your primary defense against freezer burn.
Add Secondary Protection
Wrap the plastic-covered steak in aluminum foil, or place in a freezer-grade zip-top bag with air pressed out. For maximum protection, use both foil and a bag. Double or triple wrapping significantly extends quality retention time.
Label with Details
Write the cut type, weight, and freeze date on the package with permanent marker. This information helps you use oldest items first and plan appropriate thawing times based on steak size.
| Steak Cut | Maximum Freezer Time | Quality Notes |
|---|---|---|
| Filet Mignon | 9-12 months | Lean cuts freeze exceptionally well with minimal quality loss |
| Ribeye | 6-9 months | Higher fat content means slightly shorter optimal storage |
| Strip Steak | 9-12 months | Moderate marbling maintains quality throughout storage |
| Ground Beef | 3-4 months | Higher surface area accelerates quality decline |
Preventing Freezer Burn
Freezer burn results from improper packaging that allows air exposure. Prevention requires eliminating air contact through tight wrapping or vacuum sealing. Even small gaps permit sublimation, the process where ice converts directly to water vapor without melting, leaving dehydrated areas on the meat surface.
✅ Freezer Organization Tips
First In, First Out: Arrange packages so oldest items are most accessible
Flat Freezing: Lay packages flat until frozen, then stack to save space
Dedicated Section: Keep a freezer area exclusively for meats to prevent odor transfer
Temperature Check: Use a freezer thermometer to verify consistent 0°F or below

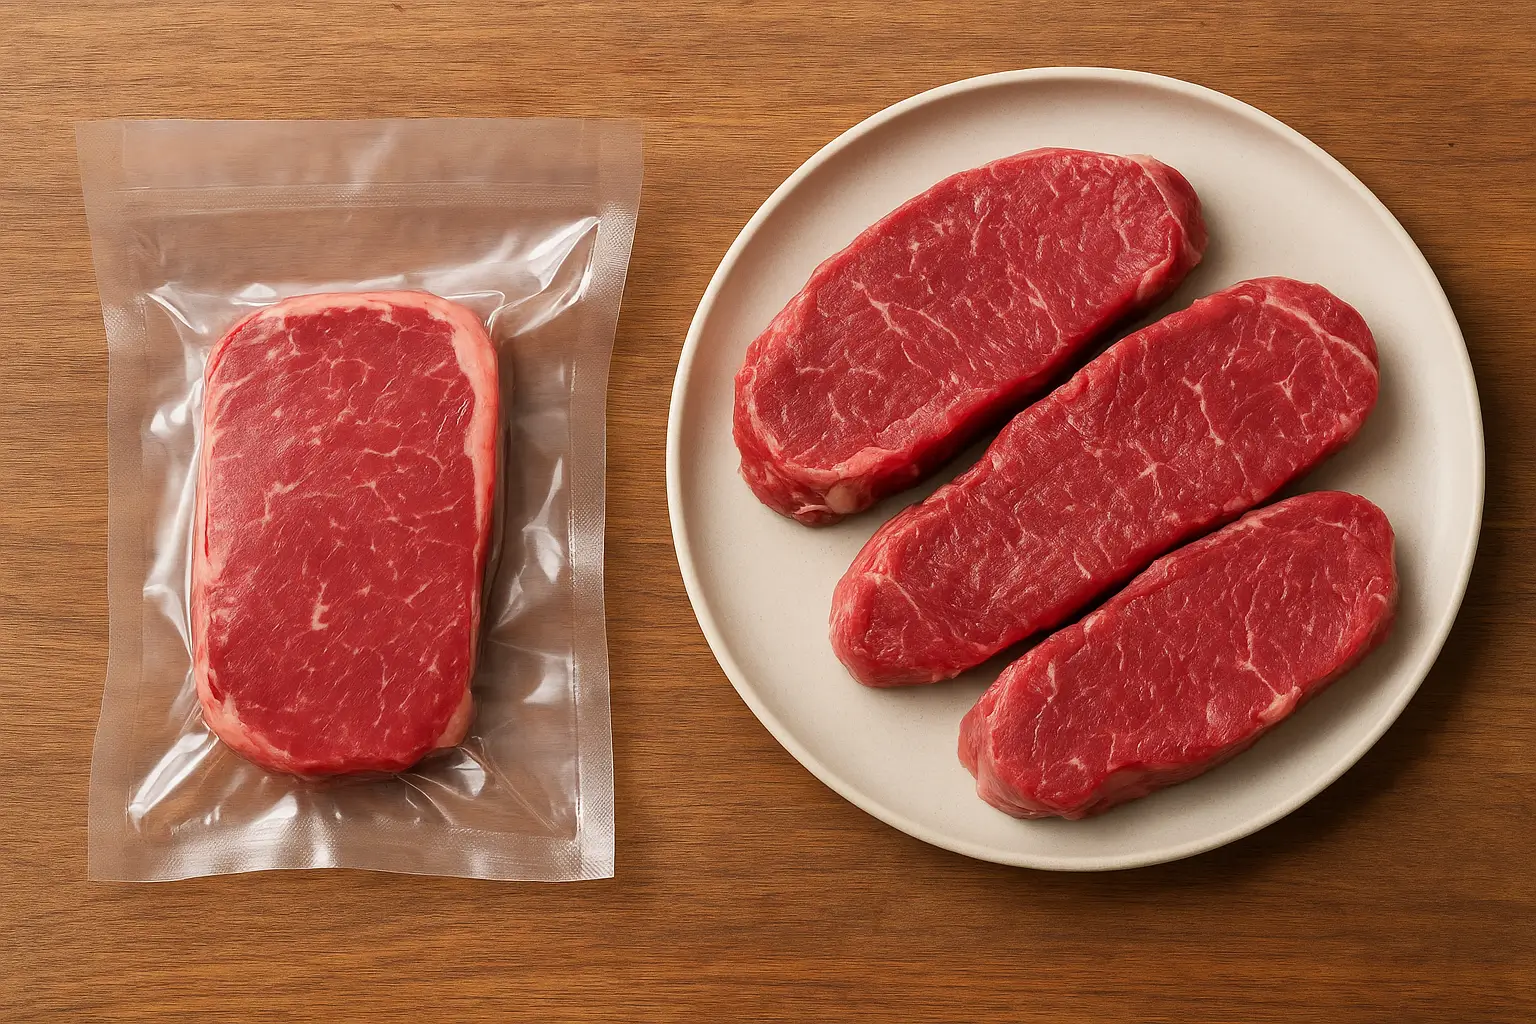
The Vacuum Sealing Advantage
Vacuum sealing represents the gold standard for steak storage, removing virtually all air from packaging to prevent oxidation and freezer burn. This method extends freezer life significantly and maintains quality better than traditional wrapping techniques.
How Vacuum Sealing Works
Vacuum sealers extract air from specially designed plastic bags, then heat-seal the opening to create an airtight package. By removing oxygen, vacuum sealing prevents the oxidation reactions that cause color changes, off-flavors, and texture degradation. The tight packaging also prevents ice crystal formation on the meat surface.
Benefits Beyond Freezer Storage
Vacuum-sealed steaks offer advantages even in refrigerator storage, extending freshness from the typical 3-5 days to 7-10 days. The oxygen-free environment significantly slows bacterial growth and enzymatic processes. Many professional butchers and premium suppliers ship steaks vacuum-sealed for this reason.
🎯 Vacuum Sealing Best Practices
Dry Thoroughly: Moisture interferes with seal formation, so pat steaks completely dry
Leave Space: Allow 3-4 inches between meat and seal line for reliable closure
Avoid Sharp Bones: Cover bone ends with paper towels to prevent bag puncture
Double Seal: Create two seal lines for extra security on long-term storage
Test Seal: Check for air bubbles or leaks before freezing
Equipment Investment
Home vacuum sealers range from budget-friendly handheld models to commercial-grade chamber sealers. For occasional home use, mid-range countertop models provide excellent results at reasonable cost. Quality machines include adjustable vacuum pressure to prevent crushing delicate foods and settings for moist versus dry items.
The investment pays for itself quickly when storing premium steaks. A properly vacuum-sealed filet mignon maintains quality for over a year in the freezer, compared to 4-6 months with conventional wrapping. This extended timeline allows you to purchase steaks in bulk during sales without quality concerns.
Safe Thawing Methods Explained
Thawing method matters as much as storage technique. Improper thawing creates food safety risks and compromises texture. Never thaw steak on the kitchen counter at room temperature, despite how common this practice remains. The outer portions enter the danger zone temperature range while the center stays frozen, creating ideal conditions for bacterial growth.
Three Safe Thawing Approaches
Food safety experts recognize three acceptable thawing methods: refrigerator thawing, cold water thawing, and microwave thawing. Each has distinct advantages and limitations based on available time and circumstances.
🔥 Thawing Method Comparison
✅ Refrigerator Thawing
- Safety: Safest method, maintains cold temperature throughout
- Quality: Best texture and moisture retention
- Flexibility: Thawed steak stays fresh 1-2 additional days
- Drawback: Requires advance planning (24 hours typical)
✅ Cold Water Thawing
- Speed: Much faster than refrigerator (2-3 hours)
- Safety: Safe when water changed every 30 minutes
- Quality: Good results when done correctly
- Drawback: Requires monitoring and immediate cooking
Why Microwave Thawing Fails for Steak
While microwave thawing is technically safe, it produces poor results for steak. Microwaves heat unevenly, partially cooking exterior areas while centers remain frozen. This creates texture problems and begins the cooking process prematurely, making it nearly impossible to achieve proper doneness later. Reserve microwave thawing for ground beef and other applications where texture is less critical.
⚠️ Never Use These Methods
Hot Water Thawing: Warm water promotes rapid bacterial growth on outer surfaces
Counter Thawing: Room temperature allows dangerous bacteria multiplication
Oven Thawing: Even low heat begins cooking exterior while center stays frozen
Outdoor Thawing: Unpredictable temperatures create serious safety risks

Refrigerator Thawing: The Gold Standard
Refrigerator thawing produces the best results for steak, maintaining safety while preserving texture and moisture. This method requires planning ahead but delivers consistently superior outcomes worth the advance preparation.
Step-by-Step Refrigerator Thawing
Calculate Thawing Time
Plan for approximately 24 hours of thawing per 1-2 pounds of steak. A typical 8-ounce filet needs 12-18 hours, while a 2-pound ribeye requires a full 24 hours. Larger roasts may need 48 hours or more. When uncertain, add extra time.
Prepare Storage Container
Place frozen steak (in its packaging) on a plate or in a shallow container to catch any condensation or juices as it thaws. This prevents cross-contamination of refrigerator shelves and other foods.
Position on Bottom Shelf
Place the container on the lowest refrigerator shelf where temperature is coldest and most stable. This location ensures the steak never enters the danger zone temperature range during thawing.
Monitor Progress
Check periodically to ensure consistent thawing. The steak should feel uniformly soft throughout when fully thawed, with no frozen areas remaining. Insert a thin knife into the thickest part to test—it should slide in easily with no resistance.
Post-Thaw Handling
Once thawed, steak remains safe in the refrigerator for 1-2 days before cooking. This flexibility allows you to thaw ahead even if your exact cooking schedule is uncertain. Never refreeze raw steak that was thawed in the refrigerator unless you cook it first—while safe, the quality suffers significantly from repeated freeze-thaw cycles.
✅ Pro Thawing Tips
Thaw in Original Packaging: Leave vacuum-sealed or commercial packaging intact during thawing
Pat Dry Before Cooking: Remove excess moisture with paper towels after thawing for better searing
Bring to Room Temperature: After thawing, let steak sit 30 minutes before cooking for even results
Plan Ahead: Transfer steak from freezer to refrigerator the day before you need it
Accelerated Refrigerator Thawing
You can speed refrigerator thawing slightly by placing the packaged steak on an aluminum surface like a heavy baking sheet. Aluminum’s high thermal conductivity helps draw cold from the refrigerator into the frozen meat more efficiently than ceramic plates or plastic containers, reducing thawing time by several hours.
Cold Water Thawing: Quick Alternative
When you need thawed steak today but forgot to transfer it from the freezer yesterday, cold water thawing provides a safe, faster alternative. This method thaws a typical steak in 2-3 hours while maintaining food safety, though it requires more active attention than refrigerator thawing.
Proper Cold Water Thawing Technique
Verify Packaging Integrity
Ensure steak is in a leak-proof package. If not, place it in a zip-top freezer bag, pressing out all air before sealing. Any openings allow water to contact the meat directly, causing waterlogging and texture problems.
Submerge in Cold Water
Fill a large bowl or clean sink with cold tap water. Submerge the sealed steak completely, weighing it down with a plate if it floats. The water temperature must remain cold—never warm or hot.
Change Water Every 30 Minutes
Drain and refill with fresh cold water every half hour. As the steak thaws, it chills the surrounding water, slowing the process. Fresh cold water maintains efficient heat transfer for continued thawing.
Check for Complete Thawing
After 2-3 hours for typical steaks, test doneness by pressing through the package. The meat should feel uniformly soft with no hard frozen spots. Cook immediately after thawing—do not refrigerate.
⚠️ Critical Cold Water Rules
Must Cook Immediately: Cold water-thawed steak must be cooked right away, not refrigerated for later
No Warm Water: Warm or hot water creates bacterial growth conditions on outer surfaces
Sealed Packaging Only: Direct water contact damages texture and flavor
Monitor Constantly: This method requires attention—don’t start if you’ll be away
Why Cold Water Works
Water transfers heat (or cold) 20 times more efficiently than air, explaining why cold water thawing works faster than refrigerator thawing. The constant temperature exchange between cold water and frozen meat accelerates thawing while the cold temperature prevents bacterial growth. Regular water changes maintain this efficient heat transfer throughout the process.
Thawing Time Guidelines
| Steak Size | Approximate Time | Water Change Schedule |
|---|---|---|
| Individual Steaks (6-8 oz) | 1.5-2 hours | Every 30 minutes |
| Thick Steaks (12-16 oz) | 2-3 hours | Every 30 minutes |
| Multiple Steaks (package) | 3-4 hours | Every 30 minutes |
| Small Roast (2-3 lbs) | 4-6 hours | Every 30 minutes |

Common Storage Mistakes to Avoid
Even with good intentions, many home cooks make storage errors that compromise steak quality and safety. Understanding these common mistakes helps you avoid them and consistently achieve optimal results.
❌ Critical Errors to Avoid
- Storing unwrapped or loosely wrapped steaks
- Placing raw meat on upper refrigerator shelves
- Refreezing thawed steak multiple times
- Using non-freezer-grade storage bags
- Ignoring temperature fluctuations in freezer
- Storing steak past recommended timeframes
- Thawing on the kitchen counter
✅ Success Habits to Adopt
- Always double-wrap for freezer storage
- Store raw meat on bottom shelf only
- Freeze immediately if not using within 3 days
- Invest in quality freezer bags or vacuum sealer
- Check and maintain consistent freezer temperature
- Label everything with date and contents
- Use first-in, first-out inventory rotation
- Thaw in refrigerator or cold water only
Mistake #1: Inadequate Packaging
The single most common storage error is insufficient packaging protection. Store-wrapped steaks in thin plastic or butcher paper lack adequate moisture and air barriers for freezer storage. Even slight air exposure causes freezer burn over time, creating dry, discolored areas that must be trimmed before cooking.
Solution: Always rewrap steaks properly before freezing, using plastic wrap pressed directly against the meat surface, followed by aluminum foil or freezer bags. This double-layer approach provides effective protection for months of storage.
Mistake #2: Temperature Inconsistency
Refrigerators and freezers with fluctuating temperatures damage meat quality progressively with each temperature swing. Self-defrosting freezers are particularly problematic, as their periodic warming cycles can partially thaw and refreeze meat surfaces repeatedly.
Solution: Use appliance thermometers to monitor actual temperatures in both refrigerator and freezer. Consider a chest freezer for long-term storage if you regularly keep significant meat quantities, as these maintain more consistent temperatures than upright models.
💡 Storage Duration Reality Check
While frozen steak remains technically safe indefinitely at 0°F, quality declines over time despite proper packaging. For best results, use frozen steaks within recommended timeframes: 6-12 months for most cuts. After this period, expect noticeable texture and flavor deterioration even with perfect storage conditions.
Mistake #3: Cross-Contamination Risks
Storing raw steak near ready-to-eat foods creates cross-contamination opportunities through drips, contact, or shared surfaces. Even small amounts of raw meat bacteria transferred to foods eaten without further cooking can cause serious illness.
Solution: Dedicate the bottom shelf exclusively to raw meats, always placing them on plates or in containers to catch potential drips. Never place raw meat above other foods, regardless of packaging. Clean and sanitize any surfaces that contact raw meat immediately.
Mistake #4: Ignoring Signs of Spoilage
Many cooks ignore early spoilage indicators, hoping the meat is still acceptable. This wishful thinking creates health risks. When in doubt about a steak’s freshness, the safest choice is always disposal—no meal is worth food poisoning.
Signs of Freshness vs. Spoilage
Distinguishing between fresh and spoiled steak requires understanding normal appearance changes versus actual deterioration. Some color and texture variations are perfectly normal, while others signal definite spoilage requiring disposal.
Normal Freshness Indicators
Fresh, high-quality steak exhibits specific characteristics that indicate proper handling and storage. Learning to recognize these signs helps you identify premium meat and verify that your storage methods are working effectively.
🎯 Signs of Fresh, Quality Steak
Color: Deep cherry red to burgundy (beef ages darker naturally)
Surface Texture: Slightly moist but not slimy or sticky
Smell: Mild, clean beef aroma or no smell at all
Firmness: Springs back when pressed gently
Fat Color: Creamy white or light yellow (never gray or brown)
Packaging: Intact seal with minimal purge (accumulated liquid)
Understanding Meat Color Changes
Many consumers incorrectly assume that bright red color indicates the freshest beef. In reality, meat color depends on oxygen exposure and age. Vacuum-sealed steaks often appear darker purple-red due to lack of oxygen—this is completely normal. Upon opening and air exposure, the meat “blooms” to a brighter red within 15-30 minutes.
Similarly, some brownish discoloration on the surface doesn’t necessarily mean spoilage. Myoglobin, the protein responsible for meat color, oxidizes naturally with air exposure, creating brown patches. If the meat smells fresh and feels firm, surface browning alone isn’t cause for concern. However, if accompanied by off-odors or sliminess, discard the meat immediately.
Definite Spoilage Signs
Certain indicators leave no doubt about spoilage. When you observe these characteristics, discard the steak without tasting it. Cooking does not make spoiled meat safe—bacterial toxins remain even after thorough cooking.
⚠️ Discard Steak If You Notice:
Strong Odor: Sour, ammonia-like, or putrid smell
Slimy Texture: Tacky or slick coating on the surface
Excessive Discoloration: Gray, green, or iridescent sheen throughout
Fuzzy Growth: Any visible mold or bacterial colonies
Package Bloating: Swollen packaging indicating bacterial gas production
Extreme Freezer Burn: Extensive gray-brown dehydrated areas
The Sniff Test Reliability
Your nose provides the most reliable spoilage indicator. Fresh beef has a mild, almost neutral smell. Slightly aged beef may have a stronger but still clean, meaty aroma. Spoiled meat produces unmistakable foul odors—sour, ammonia-like, or putrid scents that immediately signal bacterial growth. Trust your instincts: if it smells wrong, it is wrong.
| Characteristic | Fresh Steak | Spoiled Steak |
|---|---|---|
| Odor | Mild, clean, or no smell | Sour, putrid, ammonia-like |
| Texture | Firm, slightly moist | Slimy, sticky, or mushy |
| Color | Cherry red to purple-brown | Gray-green with iridescence |
| Package | Normal or vacuum-tight | Bloated or leaking |
| Fat | White to cream colored | Gray or yellow with odor |
Freezer Burn Assessment
Freezer burn appears as whitish-gray or brown leathery spots on meat surfaces where moisture has evaporated. While not a safety hazard, freezer burn creates unpleasant dry, cardboard-like texture and off-flavors in affected areas. Small spots can be trimmed away before cooking, but extensive freezer burn ruins the entire steak.
Prevention through proper packaging is far easier than salvaging freezer-burned meat. The minimal investment in quality freezer bags or vacuum sealing equipment pays for itself by eliminating waste from freezer burn damage.

Conclusion: Protecting Your Investment
Proper storage and thawing techniques transform expensive premium steaks from potential disappointments into consistently outstanding meals. The methods outlined in this guide require minimal additional effort but deliver dramatic improvements in both quality and safety. Whether you’re storing steaks for days or months, following professional practices ensures every cut maintains its intended flavor, texture, and tenderness.
Remember the fundamental principles: maintain consistent cold temperatures, minimize air exposure through proper packaging, and always thaw safely using refrigerator or cold water methods. These core concepts apply universally regardless of specific cuts or storage duration. Master them once, and you’ll never waste money on improperly handled meat again.
🎁 Ready for Premium Quality?
Get perfectly packaged, flash-frozen steaks delivered to your door with exclusive savings!
Professional packaging ensures maximum freshness from shipping to your freezer.
Your Storage Success Checklist
- Refrigerator Storage: Use within 3-5 days, double-wrap if original packaging is opened, store on bottom shelf
- Freezer Storage: Wrap tightly in plastic then foil or vacuum seal, label with date, use within 6-12 months for best quality
- Temperature Management: Maintain refrigerator at 32-40°F and freezer at 0°F or below consistently
- Thawing Priority: Plan ahead for refrigerator thawing (24 hours), use cold water method only when necessary
- Safety First: Trust your senses for freshness assessment, discard questionable meat without tasting
Investment in Tools and Knowledge
Consider the cost of proper storage equipment as insurance on your meat purchases. A quality instant-read thermometer for your refrigerator and freezer costs less than a single premium steak but protects every cut you store. Similarly, a vacuum sealer represents a one-time investment that pays dividends through reduced waste and extended storage capability.
“The difference between mediocre and exceptional home-cooked steak often has nothing to do with cooking technique—it’s determined by how the meat was stored before it ever touched the pan. Respect the storage process, and your steaks will reward you with restaurant-quality results every time.”
— Professional Butchers Association
Armed with these professional storage and thawing techniques, you can confidently purchase steaks in bulk during sales, stock your freezer with premium cuts, and know that each steak will deliver the exceptional quality you paid for. The peace of mind that comes from proper food handling enhances the entire cooking and dining experience, letting you focus on preparation and enjoyment rather than worrying about safety or quality.
💡 Final Storage Wisdom
Create a simple freezer inventory system using a notebook or smartphone app. List each package with contents, quantity, and freeze date. Cross items off as you use them and update regularly. This organization prevents forgotten packages from languishing past their prime and helps you rotate stock efficiently for optimal quality.
Common Questions Answered
Can I refreeze thawed steak? Only if it was thawed in the refrigerator and hasn’t been at room temperature. Quality will decline, but it’s safe. Never refreeze meat thawed by other methods.
How long can cooked steak stay in the refrigerator? Properly stored cooked steak lasts 3-4 days refrigerated in an airtight container. Reheat to 165°F for safety.
Does freezing affect steak quality? Properly frozen steak maintains excellent quality for months. Flash-frozen commercial products from suppliers like Omaha Steaks often match fresh quality due to superior freezing technology.
What’s the white stuff in my steak package? Ice crystals or purge (protein and water mixture) are normal in sealed packages. Pat the steak dry before cooking.
Your success with steak begins long before cooking—it starts with smart storage choices that preserve quality from purchase to plate. Implement these techniques consistently, and you’ll never again experience the disappointment of a steak that didn’t live up to its potential due to poor handling. Every cut deserves the respect of proper storage, and every meal deserves the excellence that proper storage enables.