How to Cook the Perfect Filet Mignon at Home | Expert Guide 2025
📋 Table of Contents
- Introduction: The Art of Cooking Filet Mignon
- Understanding Filet Mignon
- Selecting the Perfect Filet Mignon
- Essential Preparation Steps
- Cooking Methods Explained
- The Pan-Searing Technique
- Grilling to Perfection
- Oven-Roasting Method
- Temperature Guide for Doneness
- Common Mistakes to Avoid
- Serving and Pairing Suggestions
- Conclusion
Introduction: The Art of Cooking Filet Mignon
Filet mignon, the crown jewel of beef cuts, represents the pinnacle of steak perfection. This incredibly tender cut from the beef tenderloin has graced the menus of five-star restaurants for generations, but mastering it at home is entirely achievable with the right techniques and knowledge.
Many home cooks feel intimidated by cooking filet mignon, worried they’ll ruin an expensive piece of meat. The truth is, filet mignon is actually one of the most forgiving cuts to cook when you understand a few fundamental principles. Its exceptional tenderness and mild flavor make it an ideal canvas for various cooking methods and seasonings.
In this comprehensive guide, we’ll walk you through every step of preparing restaurant-quality filet mignon in your own kitchen. From selecting the perfect cut to achieving that coveted caramelized crust and buttery interior, you’ll learn the professional techniques that transform a premium steak into an unforgettable dining experience. Whether you’re planning a romantic dinner, celebrating a special occasion, or simply treating yourself to something extraordinary, this guide will ensure your filet mignon turns out perfect every single time.

💡 Quick Success Tip
The three keys to perfect filet mignon are: bringing the meat to room temperature before cooking, using high heat for proper searing, and letting it rest after cooking. Master these three principles, and you’re 90% of the way to steakhouse perfection.
Understanding Filet Mignon: What Makes It Special
Filet mignon, French for “tender fillet,” comes from the smaller end of the beef tenderloin, a muscle that runs along the spine. Because this muscle does very little work during the animal’s life, it remains extraordinarily tender—the most tender cut of beef available. This explains both its premium price tag and its legendary status among steak enthusiasts.
What Sets Filet Mignon Apart
Unlike heavily marbled cuts like ribeye or strip steak, filet mignon contains minimal intramuscular fat. This characteristic gives it a leaner profile and more subtle beef flavor, but its buttery texture is unmatched. The lack of fat also means filet mignon cooks quickly and requires careful attention to avoid overcooking.
A typical filet mignon portion weighs between 6 to 8 ounces and stands 1.5 to 2 inches thick. Premium Omaha Steaks packages often include perfectly portioned filet mignons that eliminate the guesswork of sizing and ensure consistent results.
🎯 Why Choose Filet Mignon?
Texture: The most tender cut available, requiring minimal chewing
Flavor Profile: Mild, clean beef taste that pairs well with bold seasonings and sauces
Versatility: Accommodates various cooking methods and flavor enhancers
Presentation: Elegant appearance perfect for special occasions
Health: Leaner than many other premium cuts
The Difference Quality Makes
Not all filet mignons are created equal. Quality depends on several factors including the cattle’s diet, age, and breed, as well as proper aging after processing. USDA Prime and Choice grades represent the highest quality available to consumers, with Prime featuring slightly more marbling for enhanced flavor.
Companies like Omaha Steaks select only the top 10% of beef available, hand-trimming each filet to remove excess fat and silver skin. Their proprietary aging process further enhances tenderness, creating a product that consistently delivers restaurant-quality results at home.
Selecting the Perfect Filet Mignon
Choosing the right filet mignon sets the foundation for cooking success. Whether shopping at a butcher, supermarket, or ordering from a premium supplier, knowing what to look for ensures you start with the best possible product.
Key Selection Criteria
| Characteristic | What to Look For | Why It Matters |
|---|---|---|
| Color | Deep cherry red, not brown or gray | Indicates freshness and proper handling |
| Thickness | 1.5 to 2 inches minimum | Allows proper crust development without overcooking center |
| Marbling | Light, fine white streaks throughout | Adds flavor and moisture during cooking |
| Moisture | Slightly moist but not wet or slimy | Shows proper aging and storage |
| Trimming | Minimal exterior fat, silver skin removed | Prevents chewy texture and ensures even cooking |
Fresh vs. Frozen
While fresh filet mignon from a quality butcher is excellent, properly frozen filets can be equally outstanding. The key difference lies in the freezing method. Flash-freezing technology, used by premium suppliers, creates smaller ice crystals that preserve the meat’s cellular structure, maintaining texture and moisture better than traditional freezing.
✅ Pro Shopping Tip
Look for filets labeled “center-cut tenderloin” for the most consistent thickness and tenderness. The tapered ends of the tenderloin, while still delicious, cook less evenly due to their irregular shape. If buying frozen, ensure packages are solidly frozen with no ice crystals or freezer burn visible.
Quantity Planning
Plan for 6 to 8 ounces per person for a main course serving. Filet mignon’s richness means smaller portions satisfy more than you might expect. If you’re new to cooking this cut, consider purchasing from verified Omaha Steaks deals where portion sizes are precisely cut and quality is guaranteed.
Essential Preparation Steps
Proper preparation separates good filet mignon from truly exceptional results. These steps may seem simple, but each plays a crucial role in the final outcome.
Remove from Refrigeration Early
Take your filet mignon out of the refrigerator 30 to 45 minutes before cooking. Room temperature meat cooks more evenly, preventing the exterior from overcooking while the center reaches the desired temperature. This single step dramatically improves consistency.
Pat Completely Dry
Use paper towels to thoroughly pat all surfaces of the steak dry. Surface moisture prevents proper browning and creates steam instead of a crust. The drier the surface, the better the sear and the more flavorful the result.
Season Generously
Apply a liberal coating of kosher salt and freshly ground black pepper to all sides. Don’t be shy—much of the seasoning stays on the cutting board or pan. Season at least 20 minutes before cooking to allow salt to penetrate the meat.
Prepare Your Cooking Station
Have everything ready before you start: cooking fat, thermometer, timer, tongs, and a plate for resting. Once cooking begins, events move quickly, and you won’t have time to search for tools.
Seasoning Options Beyond Salt and Pepper
While classic salt and pepper perfectly complement filet mignon’s delicate flavor, you can enhance it with additional seasonings:
- Garlic Powder: Adds savory depth without the burning risk of fresh garlic
- Herbs de Provence: Light herbal notes that don’t overpower the beef
- Montreal Steak Seasoning: Bold, peppery blend for those who enjoy assertive flavors
- Smoked Paprika: Subtle smokiness without grilling
- Coffee Rub: Surprisingly complementary, adding complexity and color
⚠️ Critical Warning
Never use cooking oil to coat the steak before searing. The high heat needed for proper crust formation will cause the oil to smoke excessively and potentially burn. Instead, heat oil in the pan, then add the seasoned steak to the hot oil.
Cooking Methods Explained
Filet mignon adapts beautifully to three primary cooking methods: pan-searing, grilling, and oven-roasting. Each method produces distinct results while maintaining the cut’s signature tenderness. Understanding the strengths of each approach allows you to choose based on your equipment, preferences, and occasion.
🔥 Method Comparison: Quick Reference
✅ Best for Crust Development
- Pan-Searing: Creates the darkest, most flavorful crust
- Direct contact with screaming-hot cast iron
- Perfect control over browning
- Ideal for smaller quantities (1-3 steaks)
✅ Best for Smoky Flavor
- Grilling: Imparts authentic charred flavor
- Attractive grill marks
- Great for entertaining larger groups
- Keeps kitchen smoke-free
Choosing Your Method
Your choice of cooking method should consider several factors: available equipment, number of steaks being prepared, desired flavor profile, and weather conditions. Many professional chefs combine methods, such as searing on the stovetop and finishing in the oven, to capture the benefits of multiple approaches.
The reverse-sear method has gained popularity among steak enthusiasts. This technique starts the steak in a low oven (225-275°F) until it reaches 10-15 degrees below target temperature, then finishes with a high-heat sear. This approach promotes even cooking from edge to edge with minimal gradient, though it requires more time and attention.
The Pan-Searing Technique: Restaurant Method at Home
Pan-searing delivers the most consistent, controllable results for filet mignon. This method, favored by professional chefs, creates an intensely flavorful crust while keeping the interior perfectly cooked. Here’s exactly how to execute it.
Required Equipment
- Cast Iron Skillet: 10-12 inches, pre-seasoned or well-maintained
- Instant-Read Thermometer: Essential for accuracy
- Kitchen Tongs: For turning without piercing the meat
- High Smoke-Point Oil: Avocado, grapeseed, or refined canola
Preheat the Skillet
Place your cast iron skillet over high heat for 5 minutes. The pan should be screaming hot—a drop of water should instantly evaporate with a sharp sizzle. This extreme heat is essential for proper crust formation.
Add Oil and Sear First Side
Add 1-2 tablespoons of high smoke-point oil to the hot pan, swirl to coat, and immediately place your seasoned filet in the center. You should hear an aggressive sizzle. Don’t move the steak—let it sear undisturbed for 3-4 minutes.
Flip and Add Butter
Use tongs to flip the steak to the second side (it should release easily when properly seared). Add 2 tablespoons of butter, fresh thyme sprigs, and smashed garlic cloves to the pan. Tilt the pan and baste the steak with the foaming butter for 3-4 minutes.
Check Temperature and Rest
Insert an instant-read thermometer into the thickest part from the side. Remove when it reaches 5°F below your target temperature (it will continue cooking during rest). Transfer to a plate and rest for 5-10 minutes.

🎯 The Butter Basting Technique
Professional chefs use butter basting to achieve restaurant-quality results. As the butter melts and browns, tilt the pan toward you at a 45-degree angle, allowing butter to pool. Use a large spoon to continuously drizzle this aromatic butter over the top of the steak. This bastes the upper surface while the bottom sears, adding incredible flavor and promoting even cooking. The herbs and garlic infuse their essence into the butter, which then coats the meat.
The Optional Oven Finish
For thicker filets (over 2 inches), consider the stovetop-to-oven method. After searing both sides for 2-3 minutes each, transfer the entire pan to a preheated 400°F oven for 5-8 minutes until the desired internal temperature is reached. This prevents burning the exterior while thoroughly cooking the center.
Grilling to Perfection: Outdoor Cooking Excellence
Grilling filet mignon outdoors creates a distinctive smoky flavor and appealing char that indoor methods can’t replicate. The key to grilled perfection lies in managing heat zones and timing.
Grill Setup and Preparation
Create a two-zone fire by banking coals or lighting burners on only one side of your grill. This provides both direct high heat for searing and indirect moderate heat for finishing. Aim for 450-500°F in the direct zone and 300-350°F in the indirect zone.
Clean your grill grates thoroughly with a brass brush, then oil them lightly using tongs and an oil-soaked paper towel. This prevents sticking and helps create defined grill marks.
Sear Over Direct Heat
Place seasoned filets directly over the hot coals or flames. Close the lid and sear for 2-3 minutes without moving. This creates the first set of grill marks and begins the crust formation.
Rotate for Crosshatch Marks
Rotate each steak 90 degrees (don’t flip yet) and sear another 2-3 minutes. This creates the classic diamond crosshatch pattern. Now flip to the second side and repeat: 2-3 minutes, rotate 90 degrees, another 2-3 minutes.
Move to Indirect Heat
Transfer the steaks to the cooler side of the grill, close the lid, and monitor temperature. The indirect heat gently brings the center to the target temperature without further darkening the crust.
Rest and Serve
When the thermometer reads 5°F below your target, remove from the grill and rest on a cutting board tented with foil for 5-10 minutes before serving.
✅ Grilling Pro Tips
Wood Chips: Add soaked wood chips (hickory, oak, or cherry) to charcoal for subtle smoke flavor. Avoid mesquite—it’s too strong for delicate filet.
Lid Position: Keep the lid closed as much as possible to maintain consistent temperature and prevent flare-ups.
Flare-Up Management: If flames engulf the steak, immediately move it to the indirect zone until flames subside.
Gas vs. Charcoal for Filet Mignon
Both fuel types work excellently for filet mignon. Charcoal produces slightly more complex flavor due to combustion byproducts, while gas offers superior temperature control and convenience. Many competition pitmasters achieve outstanding results with gas grills by focusing on technique rather than fuel source.
Oven-Roasting Method: Gentle and Foolproof
Oven-roasting, particularly the reverse-sear method, provides the most even cooking from edge to edge with minimal temperature gradient. This approach is ideal when preparing multiple filets or when you want exceptional consistency.
The Reverse-Sear Process
The reverse-sear method flips traditional cooking logic by starting with gentle heat and finishing with intense heat. This counterintuitive approach yields remarkable results: perfectly even doneness with a thin, well-developed crust.
- Low-Temperature Roasting: Place seasoned filets on a wire rack over a baking sheet. Roast in a 250°F oven for 25-35 minutes, until internal temperature reaches 10-15°F below your target. This slow heating denatures proteins gently, promoting even doneness.
- Rest Period: Remove from oven and rest for 10 minutes while you preheat a cast iron skillet over high heat. During this rest, the meat’s temperature equalizes throughout.
- Final Sear: Add oil to the screaming-hot skillet and sear the steak for 45-60 seconds per side, just long enough to create a crust without further cooking the interior.
- Brief Second Rest: Rest for 5 minutes before slicing to allow the crust to set and juices to redistribute.
Traditional Oven-Roasting
For a simpler approach, start with a stovetop sear (2-3 minutes per side in a hot oven-safe pan), then transfer the entire pan to a preheated 425°F oven for 5-10 minutes depending on thickness and desired doneness. This method combines the ease of oven cooking with the flavor benefits of initial searing.
💡 Temperature Tip
When using the oven, position the rack in the center position for most even heat distribution. Avoid placing the rack too high or low, as this creates hot or cool spots that affect cooking consistency. Use an oven thermometer to verify your oven’s actual temperature—many ovens run 25°F hotter or cooler than the dial indicates.
Temperature Guide for Perfect Doneness
Mastering internal temperature is the single most important skill for cooking filet mignon. Unlike visual cues, which vary based on cooking method and exterior color, temperature provides objective accuracy.
| Doneness Level | Remove from Heat | Final Temp After Rest | Characteristics |
|---|---|---|---|
| Rare | 115-120°F | 120-125°F | Cool red center, very soft texture |
| Medium-Rare | 125-130°F | 130-135°F | Warm red center, ideal for filet mignon |
| Medium | 135-140°F | 140-145°F | Warm pink center, slightly firm |
| Medium-Well | 145-150°F | 150-155°F | Slight pink throughout, firmer texture |
| Well-Done | 155°F+ | 160°F+ | No pink, very firm (not recommended for filet) |
⚠️ Important: Carryover Cooking
Meat continues cooking after removal from heat, with internal temperature rising 5-10°F during the resting period. This phenomenon, called carryover cooking, is why you must remove steaks before they reach your target temperature. Failing to account for carryover results in overcooked, disappointing steaks. For medium-rare, remove at 125-130°F, not 130-135°F.
Using a Meat Thermometer Correctly
Insert the thermometer probe from the side into the geometric center of the steak, ensuring the tip reaches the middle without touching the pan or grill. Take readings from the thickest part, as this cooks most slowly. Digital instant-read thermometers provide results in 2-3 seconds and are far superior to old-style dial thermometers.
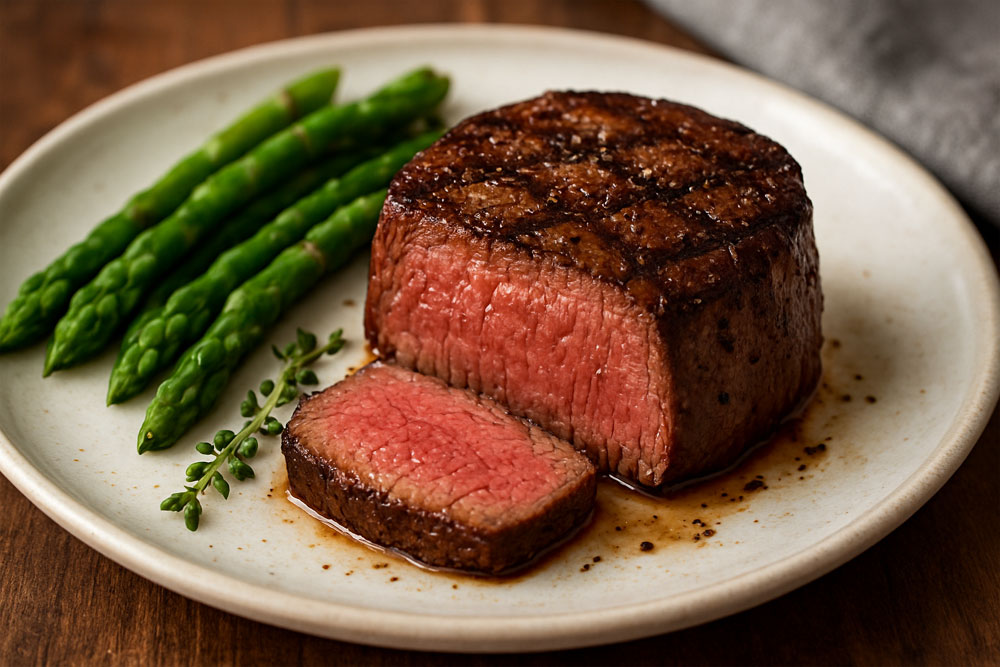
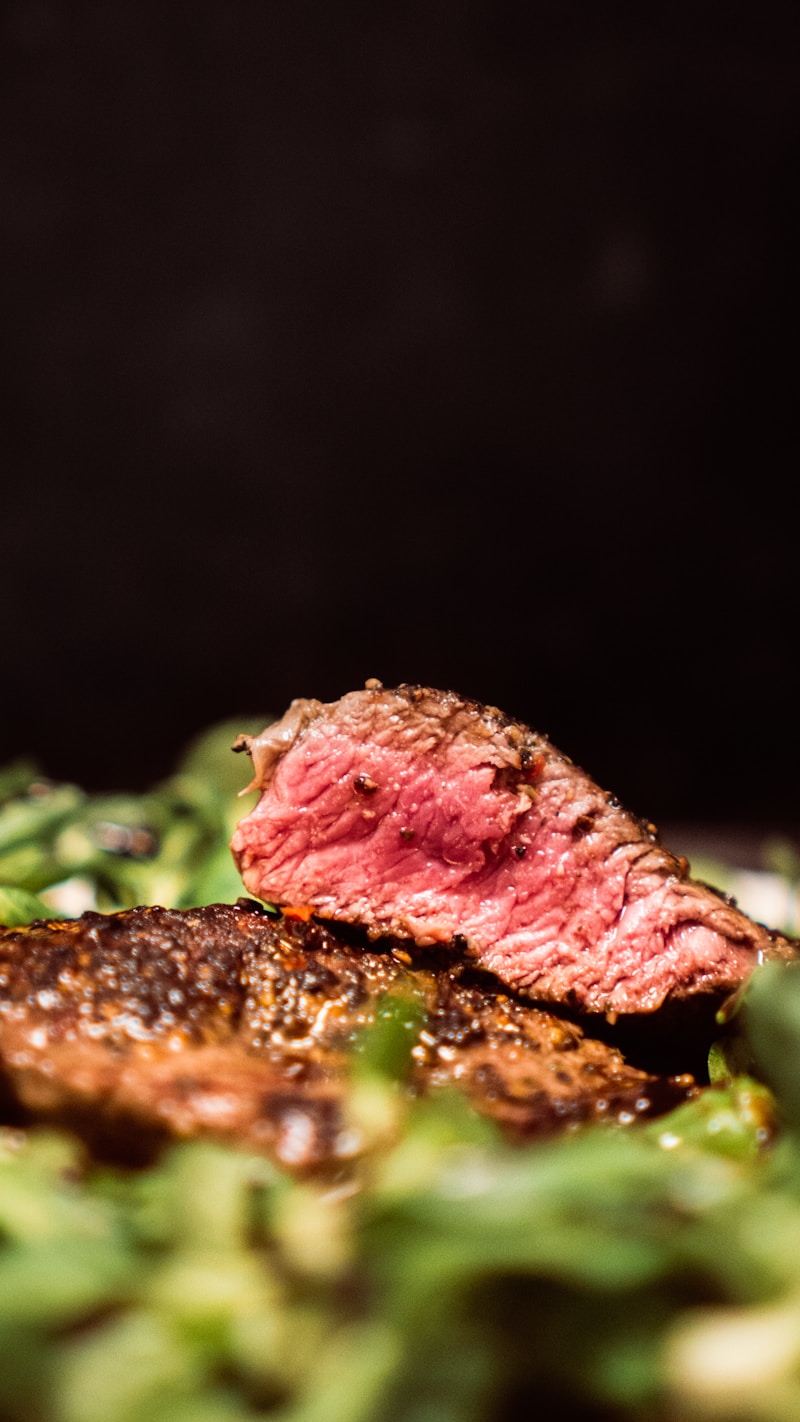
The Recommended Doneness for Filet Mignon
Medium-rare (130-135°F after resting) is universally recommended for filet mignon by chefs and culinary professionals. At this temperature, the meat’s proteins have sufficiently denatured to create tenderness while retaining moisture and developing flavor. Cooking beyond medium diminishes the qualities that make filet mignon special—its buttery texture becomes drier and tougher, and its delicate flavor becomes less pronounced.
“Filet mignon cooked past medium is a waste of money. You’re paying premium prices for extraordinary tenderness, then cooking it until that tenderness disappears. If you prefer well-done beef, choose a more marbled cut like ribeye that can handle the extra cooking time.”
— Thomas Keller, The French Laundry
Common Mistakes to Avoid
Even experienced cooks make errors when preparing filet mignon. Understanding these common pitfalls helps you avoid them and achieve consistent success.
❌ Critical Errors to Avoid
- Cooking straight from the refrigerator
- Using insufficient heat for searing
- Moving or flipping the steak too frequently
- Cutting into the steak to check doneness
- Overcrowding the pan or grill
- Using a fork to turn (punctures release juices)
- Applying sauce or butter before searing
✅ Success Habits to Adopt
- Always bring meat to room temperature
- Preheat cooking surface until smoking hot
- Leave steak undisturbed during searing
- Use an instant-read thermometer religiously
- Rest every steak for minimum 5 minutes
- Cook steaks one at a time if needed
- Turn only with tongs or a spatula
- Add butter only after crust forms
Mistake #1: Not Drying the Surface
Surface moisture is the enemy of a good crust. When water hits a hot pan, it creates steam rather than the Maillard reaction (browning) you want. Even if you’ve patted your steak dry initially, moisture accumulates while it sits at room temperature. Pat it dry again immediately before cooking for optimal results.
Mistake #2: Insufficient Pan or Grill Temperature
Home cooks often hesitate to use truly high heat, worried about smoke or burning. However, restaurant-quality crust formation requires extreme temperatures—450°F minimum. If your pan or grill isn’t hot enough, the steak will stick, steam in its own juices, and develop a gray, unappetizing exterior instead of a caramelized brown crust. Accept that proper searing generates significant smoke and plan accordingly (open windows, disable smoke alarms temporarily, use ventilation).
Mistake #3: The “Poke Test” Myth
Many cooking guides suggest pressing the steak with your finger to judge doneness by firmness. This technique is notoriously unreliable—firmness varies with muscle structure, fat content, thickness, and cooking method. Even experienced chefs struggle with accuracy using this method. For consistent results, use a thermometer every single time. A $15 instant-read thermometer eliminates all guesswork.
Mistake #4: Cutting Too Soon
The temptation to immediately slice into your beautifully cooked filet is strong, but yielding to this impulse ruins the final product. During cooking, heat forces moisture toward the center of the meat. Resting allows this moisture to redistribute throughout, resulting in juicy, evenly textured steak. Cut too soon, and a pool of juice floods your cutting board instead of staying in the meat where it belongs.
🎯 The Resting Rule
Minimum Rest Time: 5 minutes for 6-8 oz filets
Optimal Rest Time: 10 minutes for best results
Maximum Rest Time: 15 minutes (beyond this, steaks cool excessively)
Resting Method: Place on a warm plate or cutting board, tent loosely with foil (don’t wrap tightly or you’ll steam the crust). The steak will remain hot enough to enjoy even after a 10-minute rest.
Mistake #5: Wrong Pan Selection
Nonstick pans cannot withstand the high temperatures needed for proper searing and don’t develop flavorful fond (browned bits) the way cast iron or stainless steel do. Thin aluminum pans lose heat rapidly when cold meat hits the surface. Invest in a heavy cast iron skillet or thick stainless steel pan—these retain heat effectively and create superior crust formation.
Serving and Pairing Suggestions
After mastering the cooking technique, proper serving and pairing elevate your filet mignon from excellent to extraordinary. The delicate flavor of filet mignon pairs beautifully with bold accompaniments that complement without overwhelming.
Classic Sauce Pairings
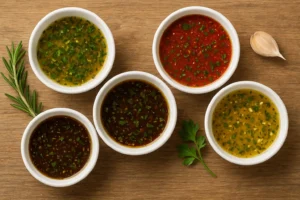
While perfectly cooked filet mignon needs no sauce, these traditional accompaniments add luxurious dimension:
- Béarnaise Sauce: The ultimate classic—tarragon-infused butter and egg yolk emulsion with subtle vinegar tang
- Red Wine Reduction: Concentrated red wine with shallots, reduced until syrupy and intensely flavorful
- Peppercorn Sauce: Creamy cognac-spiked sauce with cracked black peppercorns for heat and texture
- Blue Cheese Butter: Compound butter with pungent cheese that melts into the hot steak
- Chimichurri: Bright, herbaceous Argentinian sauce that cuts the richness beautifully
- Mushroom Demi-Glace: Earthy mushrooms in rich brown sauce for deep, savory notes

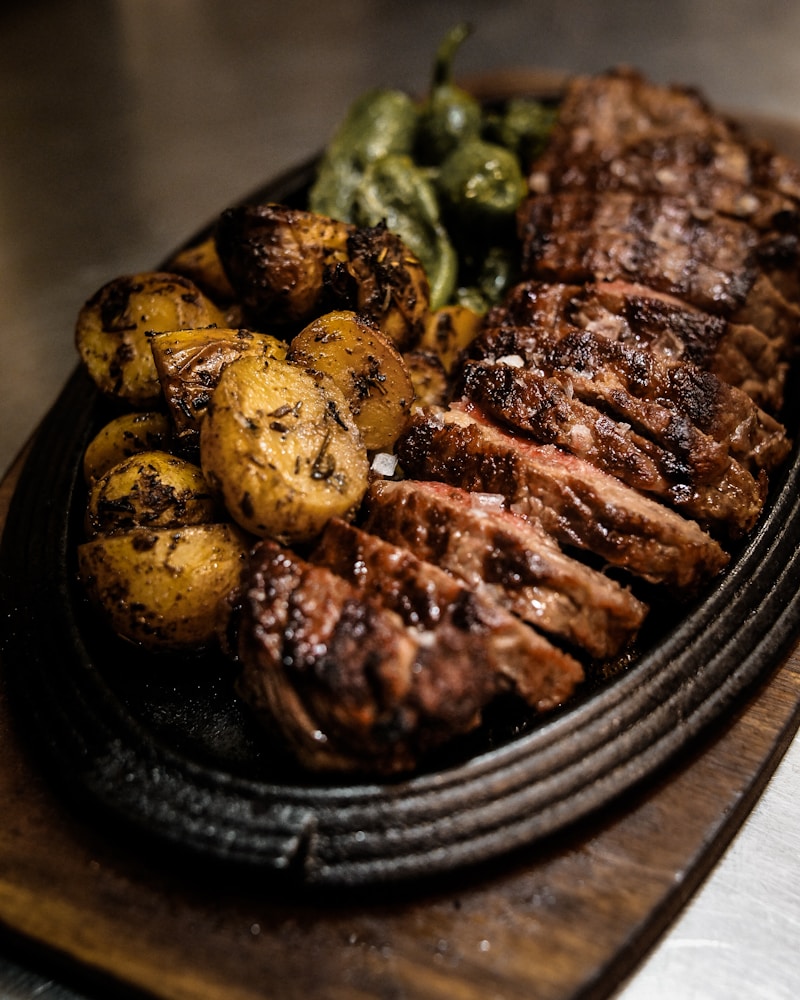
Side Dish Recommendations
Balance filet mignon’s richness with sides that provide contrasting textures and complementary flavors:
Potato Options:
- Truffle mashed potatoes
- Twice-baked potatoes with sour cream
- Crispy potato gratin
- Garlic roasted fingerlings
- Classic French fries
Vegetable Options:
- Roasted asparagus with lemon
- Creamed spinach
- Sautéed green beans almondine
- Grilled broccolini
- Brussels sprouts with bacon
For a complete steakhouse experience, check out our guide to perfect steak side dishes for more detailed recipes and pairing strategies.
Wine Pairing Recommendations
Filet mignon’s lean profile and subtle flavor pair exceptionally well with medium to full-bodied red wines:
| Wine Type | Why It Works | Specific Recommendations |
|---|---|---|
| Cabernet Sauvignon | Bold tannins complement beef’s fat and protein | Napa Valley, Bordeaux |
| Merlot | Softer tannins won’t overpower delicate filet | Pomerol, Washington State |
| Pinot Noir | Lighter body matches filet’s elegance | Burgundy, Oregon |
| Malbec | Fruity, medium tannins with smooth finish | Argentina, Cahors |
Plating for Presentation
Restaurant-quality plating enhances the dining experience:
- Warm the Plates: Run plates under hot water or place in a 200°F oven for 5 minutes before serving
- Slice Against the Grain: If serving sliced, cut perpendicular to the muscle fibers for maximum tenderness
- Strategic Sauce Placement: Pool sauce beside (not covering) the steak to showcase the beautiful crust
- Thoughtful Arrangement: Position the steak at the plate’s center with sides arranged around it, creating visual balance
- Fresh Herb Garnish: A small sprig of fresh thyme or rosemary adds color and aroma
✅ Restaurant Secret
High-end steakhouses finish their filets with a pat of compound butter placed on top immediately after plating. As it melts over the hot steak, it creates a glossy, appetizing sheen while adding rich flavor. Make compound butter by mixing softened butter with minced garlic, fresh herbs, and a pinch of flaky sea salt. Prepare ahead and refrigerate—it keeps for weeks.
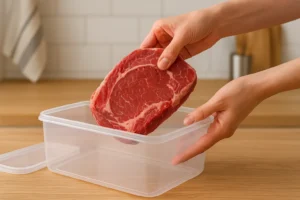
Leftover Storage and Reheating
If you have leftover cooked filet mignon (rare but possible), store it properly to maintain quality:
- Storage: Wrap tightly in plastic wrap or place in an airtight container. Refrigerate for up to 3 days
- Reheating: The oven is best—place cold steak on a wire rack over a baking sheet, warm in a 250°F oven for 20-30 minutes until heated through. This method prevents overcooking
- Alternative Use: Slice cold leftover filet thinly for salads, sandwiches, or steak and eggs breakfast
Conclusion: Your Path to Filet Mignon Mastery
Cooking the perfect filet mignon at home is entirely achievable when you understand the fundamental principles and techniques outlined in this guide. While this premium cut commands premium prices, the ability to prepare restaurant-quality results in your own kitchen transforms special occasions and delivers satisfaction that far exceeds the investment.
Remember the core elements of success: start with quality meat at room temperature, use properly high heat for searing, monitor internal temperature with a reliable thermometer, and always allow adequate resting time. These four principles, consistently applied, virtually guarantee excellent results regardless of your cooking method or experience level.
🎁 Ready to Practice Your Skills?
Get premium, perfectly portioned filet mignons delivered to your door with exclusive savings!
Use code CHEF20 for 20% off your first filet mignon order
Your Next Steps
- Invest in Essential Tools: A quality instant-read thermometer and heavy skillet are non-negotiable for consistent success
- Source Quality Meat: Start with the best filet mignon you can afford—technique only takes you so far without quality ingredients
- Practice the Technique: Your first attempt may not be perfect, but each repetition builds confidence and skill
- Experiment with Variations: Once you master the basics, try different seasonings, cooking methods, and sauce pairings
- Share Your Success: Cooking filet mignon for others creates memorable experiences and showcases your newfound skills
The journey from intimidation to mastery doesn’t happen overnight, but with the knowledge you’ve gained here, you’re well-equipped to consistently produce filet mignon that rivals any steakhouse. The combination of superior ingredients, proper technique, and attention to detail transforms a simple dinner into a culinary achievement worth celebrating.
“Cooking is about creating something delicious for people you care about. Filet mignon, prepared with knowledge and confidence, becomes more than just a meal—it’s an expression of thoughtfulness and skill that brings people together around the table.”
— Jacques Pépin, Culinary Legend
Don’t let fear of failure prevent you from attempting this magnificent cut. Every professional chef overcooked steaks while learning. The difference between them and home cooks isn’t talent—it’s persistence and willingness to learn from each attempt. Armed with this comprehensive guide, you’re positioned to skip years of trial and error and achieve remarkable results from your very first effort.
Now it’s time to put theory into practice. Gather your ingredients, prepare your cooking station, and experience the incomparable satisfaction of slicing into a perfectly cooked filet mignon you prepared yourself. Your kitchen, your rules, your triumph.
💡 Final Expert Tip
Keep a cooking journal. After each attempt, note the cut thickness, exact temperatures, timing, and results. This simple practice helps you identify patterns, refine your technique, and achieve repeatability. Within just a few attempts, you’ll develop intuition that makes cooking filet mignon feel effortless and natural.